Lesson Plan
Fruits and Vegetables: The Right Pick for Vitamins and Minerals
Grade Level
Purpose
Students will describe the farm-to-table process of common fruits and vegetables, recognize the nutrients fruits and vegetables provide, and evaluate methods of food storage and preparation for preserving nutrients. Grades 9-12
Estimated Time
Materials Needed
Engage:
- Where Does it Grow? cards, 1 copy per class, cut into individual cards
- World Map to project on board
Activity 1: From Farm to Fork
- Where Does it Grow? cards, continued from Engagement activity
- Fruits and Vegetables from Farm to Fork image
- Frozen Peas: From Farm to Fork video
- How Does it Grow? video series (selected videos)
Activity 2: Nutrients provided by Fruits and Vegetables
- Vitamins and Minerals Fact Cards, 2 copies per class (DO NOT cut into individual cards)
- Vitamins and Minerals, Why Are They Important? handout, 1 copy per student (Key)
- Timer
Activity 3: Preserving Nutrients in Storage and Food Preparation
- Where Does it Grow? cards (continued from previous activities)
- Preserving Vitamins and Minerals handout, 1 copy per student
- Frozen Peas: From Farm to Fork video
- How It's Made: Canned Corn video
- How It's Made: Raisins video
Vocabulary
empty calories: calories derived from food containing little to no nutrients
mineral: an inorganic substance needed by the human body for good health
MyPlate: nutritional guide published by the United States Department of Agriculture (USDA); icon depicting a place setting with a plate and glass divided into five food groups
nutrient dense: foods that are high in nutrients but relatively low in calories
vernalization: the induction of a plant's flowering process by exposure to the prolonged cold of winter
vitamins: a group of essential nutrients used in small quantities to regulate body processes
Did You Know?
- Native Americans dried corn and beans in the sun. Chinese and Italians dried starchy noodles. Colonial Americans pushed apple slices onto broomsticks to dry for storage.1
- Napoleon started a nationwide contest to figure out a way to preserve foods to help feed his army. It took 15 years for French scientist Nicolas Appert to secure the prize. He started by stuffing meats and cheeses into champagne bottles.2
- In 1912, Casimir Funk was credited with discovering vitamins. He proposed the idea that various diseases could be cured with nutrients that are found in food.3
Background Agricultural Connections
Until the industrial revolution, food production was simple. People ate what they grew or what others grew around them. Diets were limited to the foods that grew in their own climate and growing conditions. Today, in contrast, our food supply is produced both near and far. Our food can reasonably come from all over the world. It’s not uncommon for food to travel thousands of miles before it reaches our tables. There are five basic steps in the farm-to-table process: farm, processing, transportation, market/retail, and table. Some variation exists, but in general, fruits and vegetables are produced on farms. Once the produce is harvested, it is processed, or prepared for retail sale. This may involve simply washing and packaging the produce, like in the case of lettuce greens or apples, or it may also include steps to preserve the food for longer periods of times, such as freezing, canning, or drying. Once the produce is prepared for sale, it is transported to a store or marketplace where consumers purchase the produce for consumption in their home.
Fruits and vegetables are part of a healthy diet. If following the dietary recommendations given in MyPlate, half of a plate should be fruits and vegetables. They contain important vitamins and minerals as well as fiber and antioxidants. Vitamins and minerals help maintain a variety of healthy functions and prevent disease. Each has an important role inside. Certain foods contain more nutrients than other foods. Food are considered nutrient dense if they contain relatively low calories and high levels of vitamins, minerals, carbohydrates, lean proteins, or healthy fats. If foods are low in nutrients and high in calories, they are considered empty calories.
Every fruit and vegetable requires their own specific growing conditions for successful production. Fruits such as oranges, bananas, and pineapples require a warm, tropical, or sub-tropical climate and do not tolerate cold temperatures. Other produce such as potatoes thrive in cooler weather. Vegetables such as beets, turnips, carrots, kale and cabbage not only prefer cooler temperatures, but actually require exposure to low temperatures to promote flowering of the plant through a process called vernalization. In addition to temperature requirements, some fruits or vegetables require specific types of soil that may only be found in specific geographical regions. For example, blueberries prefer acidic soil. Our grocery stores are stocked with a wide variety of produce due to our ability to transport food from many climates and growing regions throughout the world.
For more than 12,000 years, people have been discovering ways to preserve food. Even with modern-day food production and transportation, not all foods can be consumed fresh in every part of the world. A variety of methods can be used to preserve fruits and vegetables, allowing them to be consumed long after they are harvested. The oldest method of food preservation is drying. South Americans carried potatoes into the Andes Mountains, crushed them, and then left them on a rock overnight. The cold air and high altitude was considered the first freeze-drying technique.1 Canning and freezing are also common methods used to preserve foods and lengthen their shelf life beyond their season.
Fruits and vegetables are an abundant source of vitamins and minerals. However, some of their nutritive value can be lost during food preparation. Vitamins and minerals are sensitive to heat and water. Nutrition loss occurs in the cooking process and is accelerated with increased cooking time and high temperatures. To best preserve nutrients, choose cooking methods that minimize the cooking time, the cooking temperatures, and the amount of water used. Steaming and cooking in the microwave preserves nutrients because they use little water and the cooking time is short.
Engage
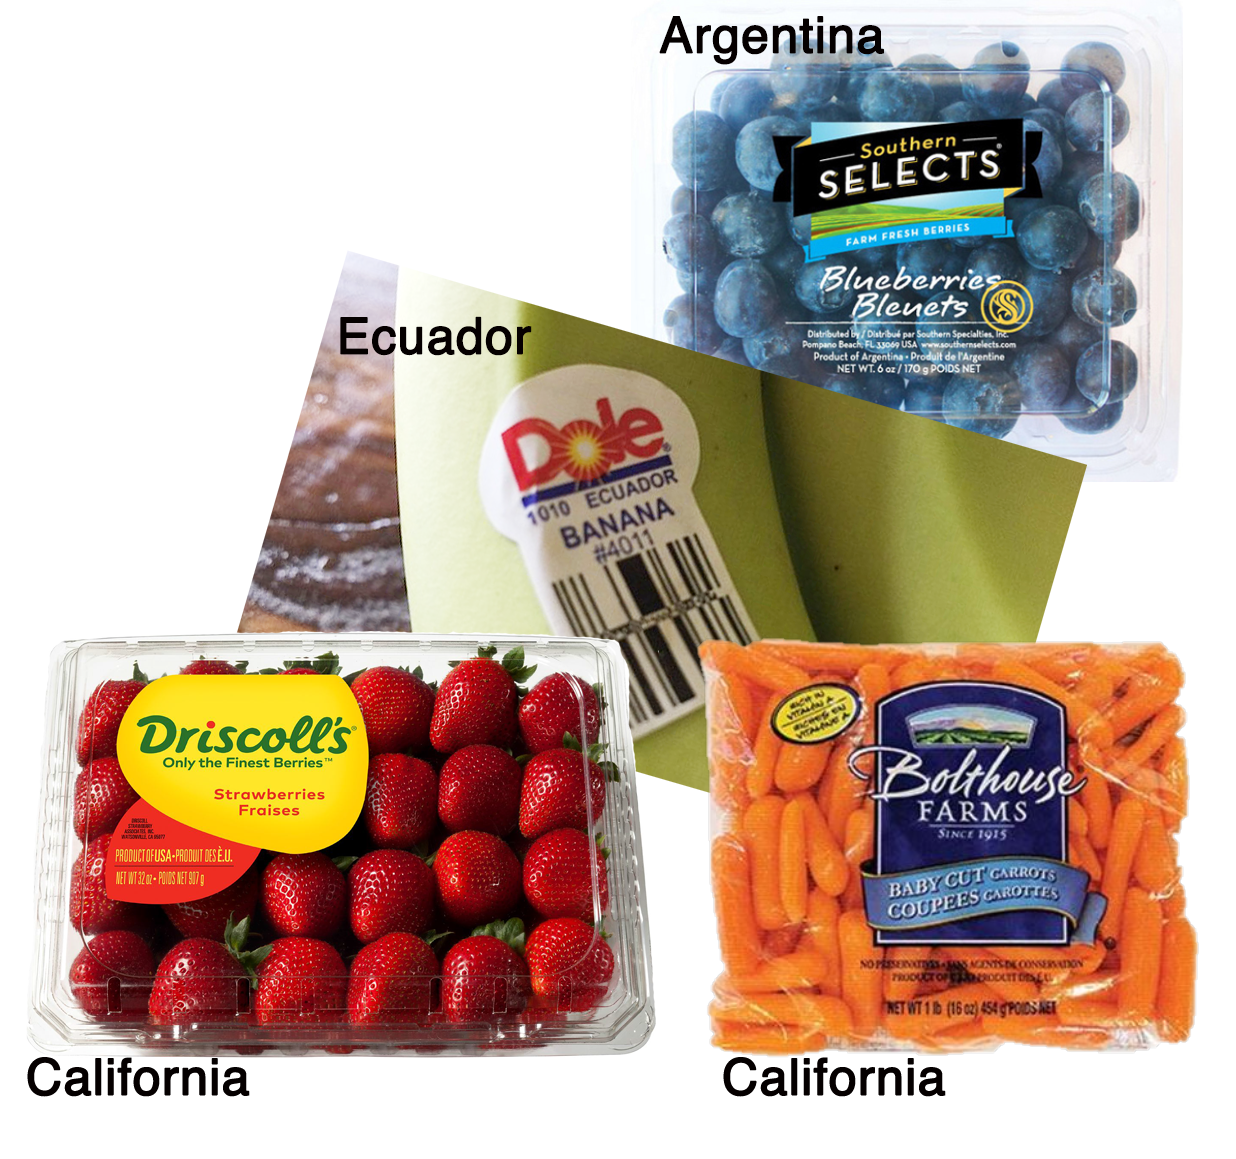
- On the day prior to class, give each student one Where Does it Grow? card. Assign them a homework activity to visit the produce section of their local grocery store to discover the location where their assigned fruit or vegetable was grown. Give students the following tips to help them succeed:
- If it was grown outside of the United States, it will have a sticker or label indicating the country it was produced in.
- Packaged produce (like baby carrots or bags of apples) often lists the name and city/state of the farm where it was grown.
- Loose produce, if it was grown in the United States, doesn’t always have an individual label indicating its origin. They can ask a produce worker to check the shipment boxes, which often have the name and location of the farm.
- If students exhaust the options above and cannot find an origin of their assigned fruit or vegetable, they should do a google search and list the top 3 states (or countries) where it is grown.
- At the beginning of class, project a map on the board. Place a star on the map indicating where you live.
- Instruct students to tape their fruit/vegetable card to the board on the state (or country) where it was produced. Remind students that each of these food items are available at a grocery store local to their homes. As you observe the map, ask questions such as:
- Which foods are grown closest to home?
- Which foods are grown farthest away?
- Are there any foods that are currently out of season? If so, are there any trends for the origin of out-of-season fruits and vegetables?
- Sometimes when certain fruits and vegetables are out of season in one growing region, they are in season in another growing region that may be closer to or on the other side of the equator. Depending on the time of year and your climate, this pattern may be observed during this activity.
- Summarize that our food supply provides an abundant variety of fruits and vegetables that can be grown on farms and transported to our homes.

Explore and Explain
Activity 1: From Farm to Fork
- Following the Interest Approach—Engagement, instruct students to collect their Where Does it Grow? food card from the map on the board. Once cards are collected, ask students, “What are the steps of getting food from the farm to our forks?” Allow students to offer their ideas, then display the Fruits and Vegetables from Farm to Fork image.

- Explain that fruits and vegetables are grown on farms all across the world. After they are harvested, they are processed. This could mean simply washing, sorting, and packaging the produce or could involve other processes like turning apples into applesauce or cucumbers into pickles. The produce is then transported to a retail market, such as a grocery store, where it is purchased by the consumer.
- Point out to students that the basic path of produce is the same (as illustrated in the Fruits and Vegetable from Farm to Fork image), but the actual growing processes vary widely from crop to crop.
- Watch a few episodes (as time permits) of the How Does It Grow? video series. Take a look at all three seasons of the series and choose a variety of fruits and vegetables to highlight.
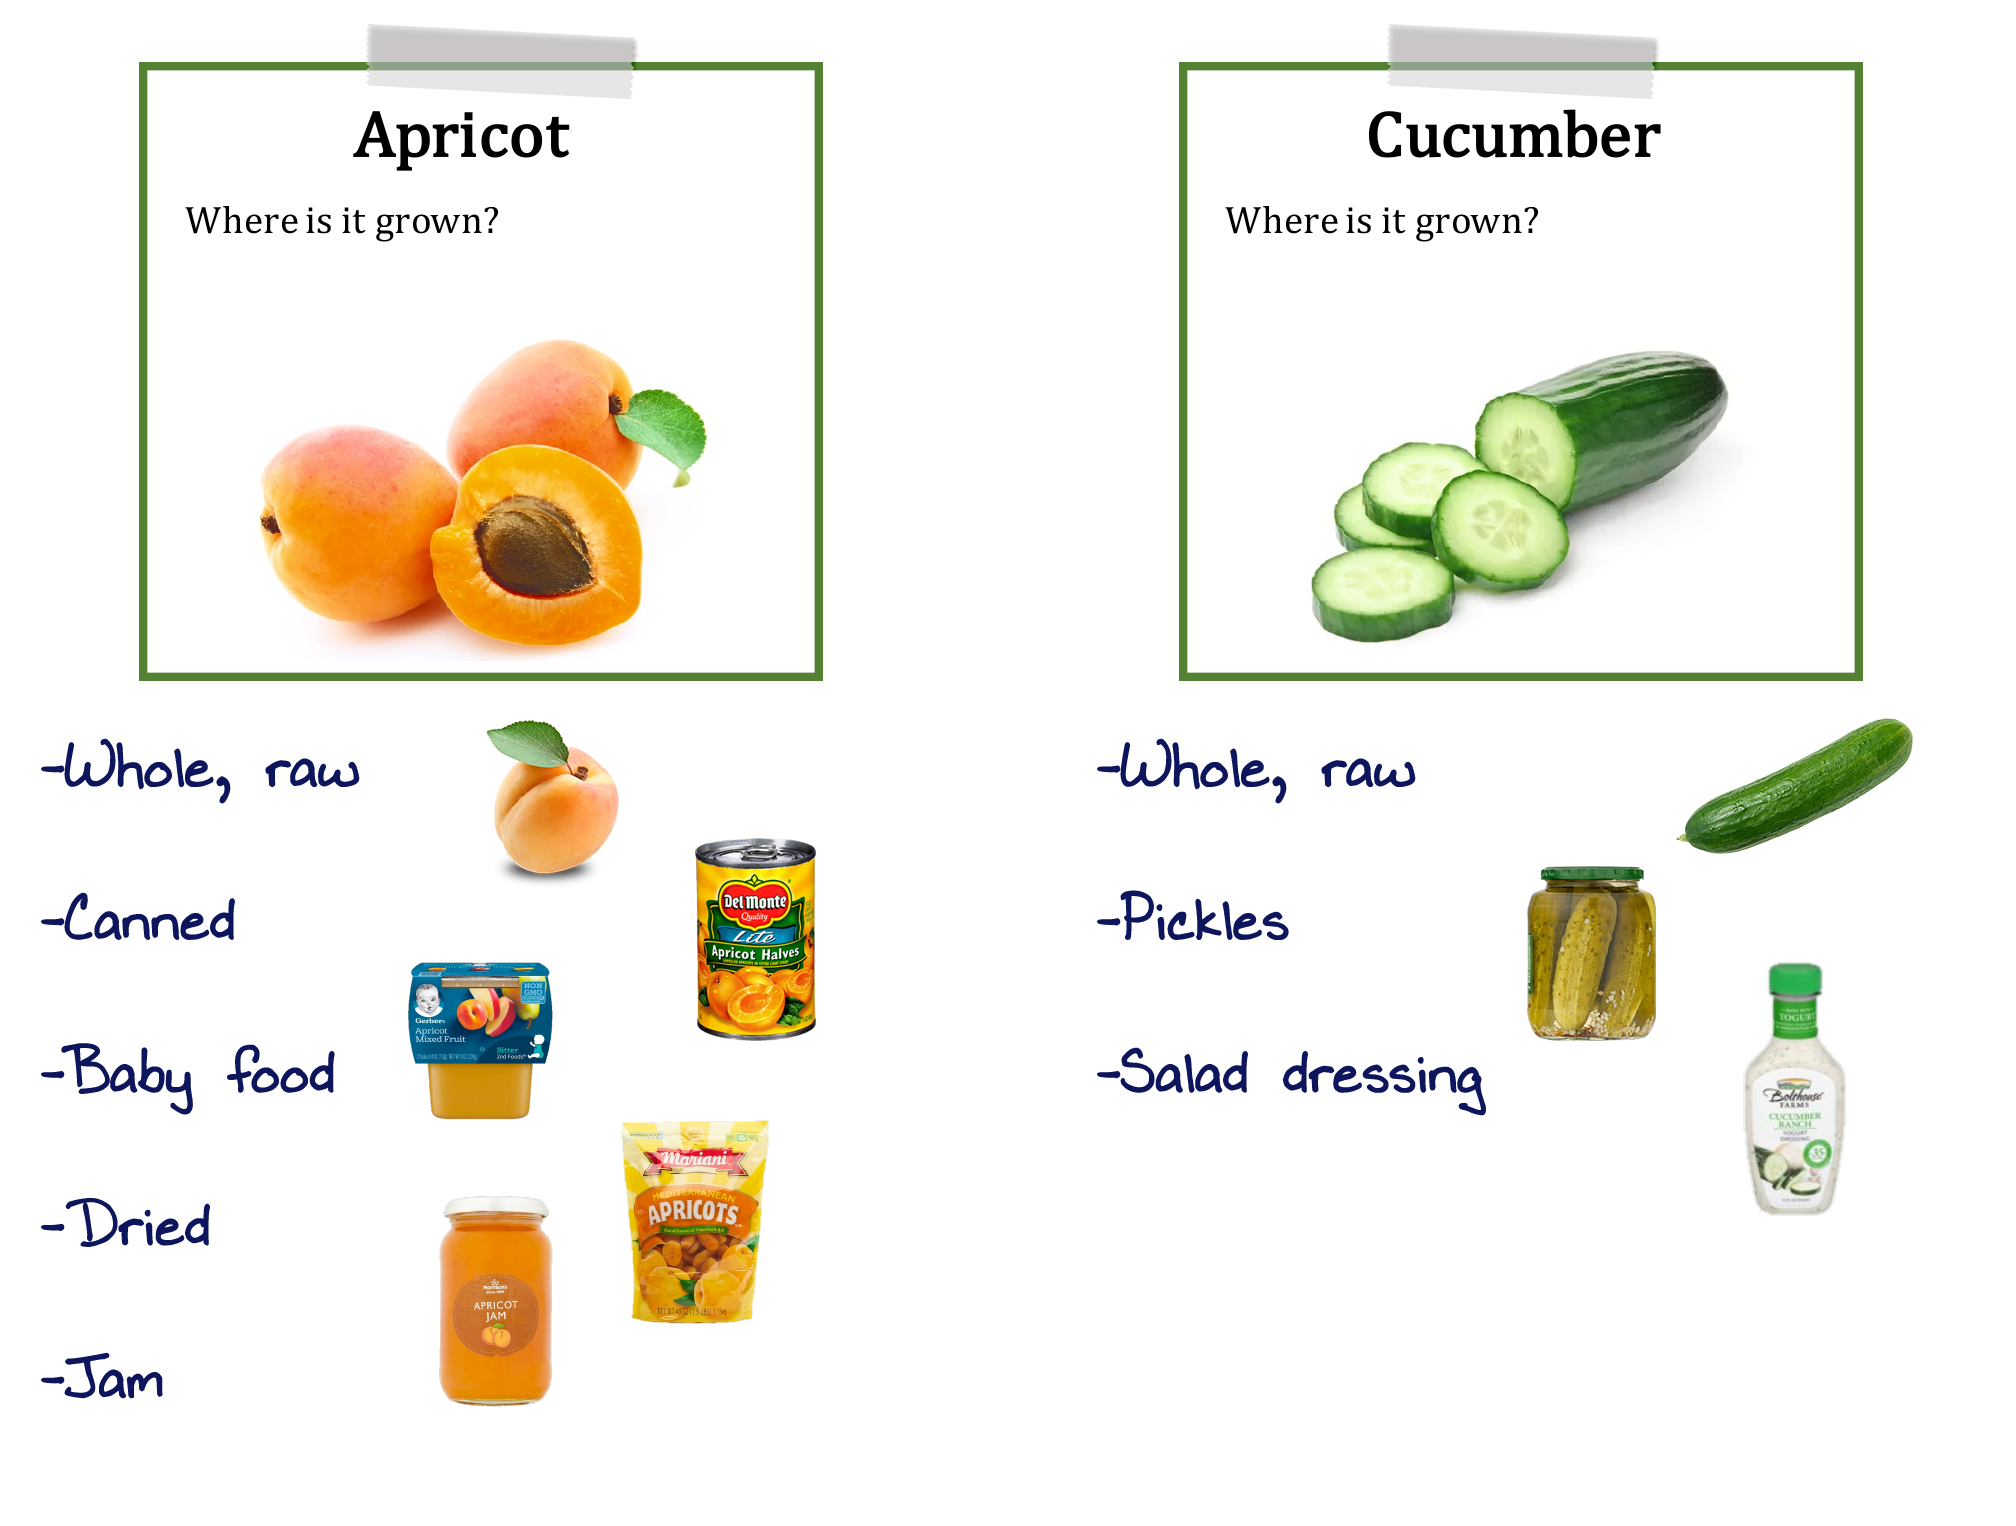
- After being produced on the farm, fruits and vegetables are processed. The word processing refers to any steps as the food leaves the farm until it is prepared for retail sale. Direct students’ attention to their Where Does it Grow? food card. Instruct students to begin thinking of all the different forms of fruits and vegetables found in the grocery store. Have students picture themselves walking through the grocery store and identifying every form they can find of their fruit or vegetable. Besides the produce section, could it be canned? Could it be frozen? Is it ever dried or used as an ingredient in another food? To help them begin thinking, give them two examples (pictured below).

- Instruct students to take their food card to the board and list every form of the fruit or vegetable underneath the card.
- After students have completed this step, summarize the value of processing food. Discuss how consuming fruits and vegetables in many forms can add variety and convenience to our diet.
- Tip: If possible, leave the food cards and processed foods lists on the board for Activity 3.
Activity 2: Nutrients Provided by Fruits and Vegetables
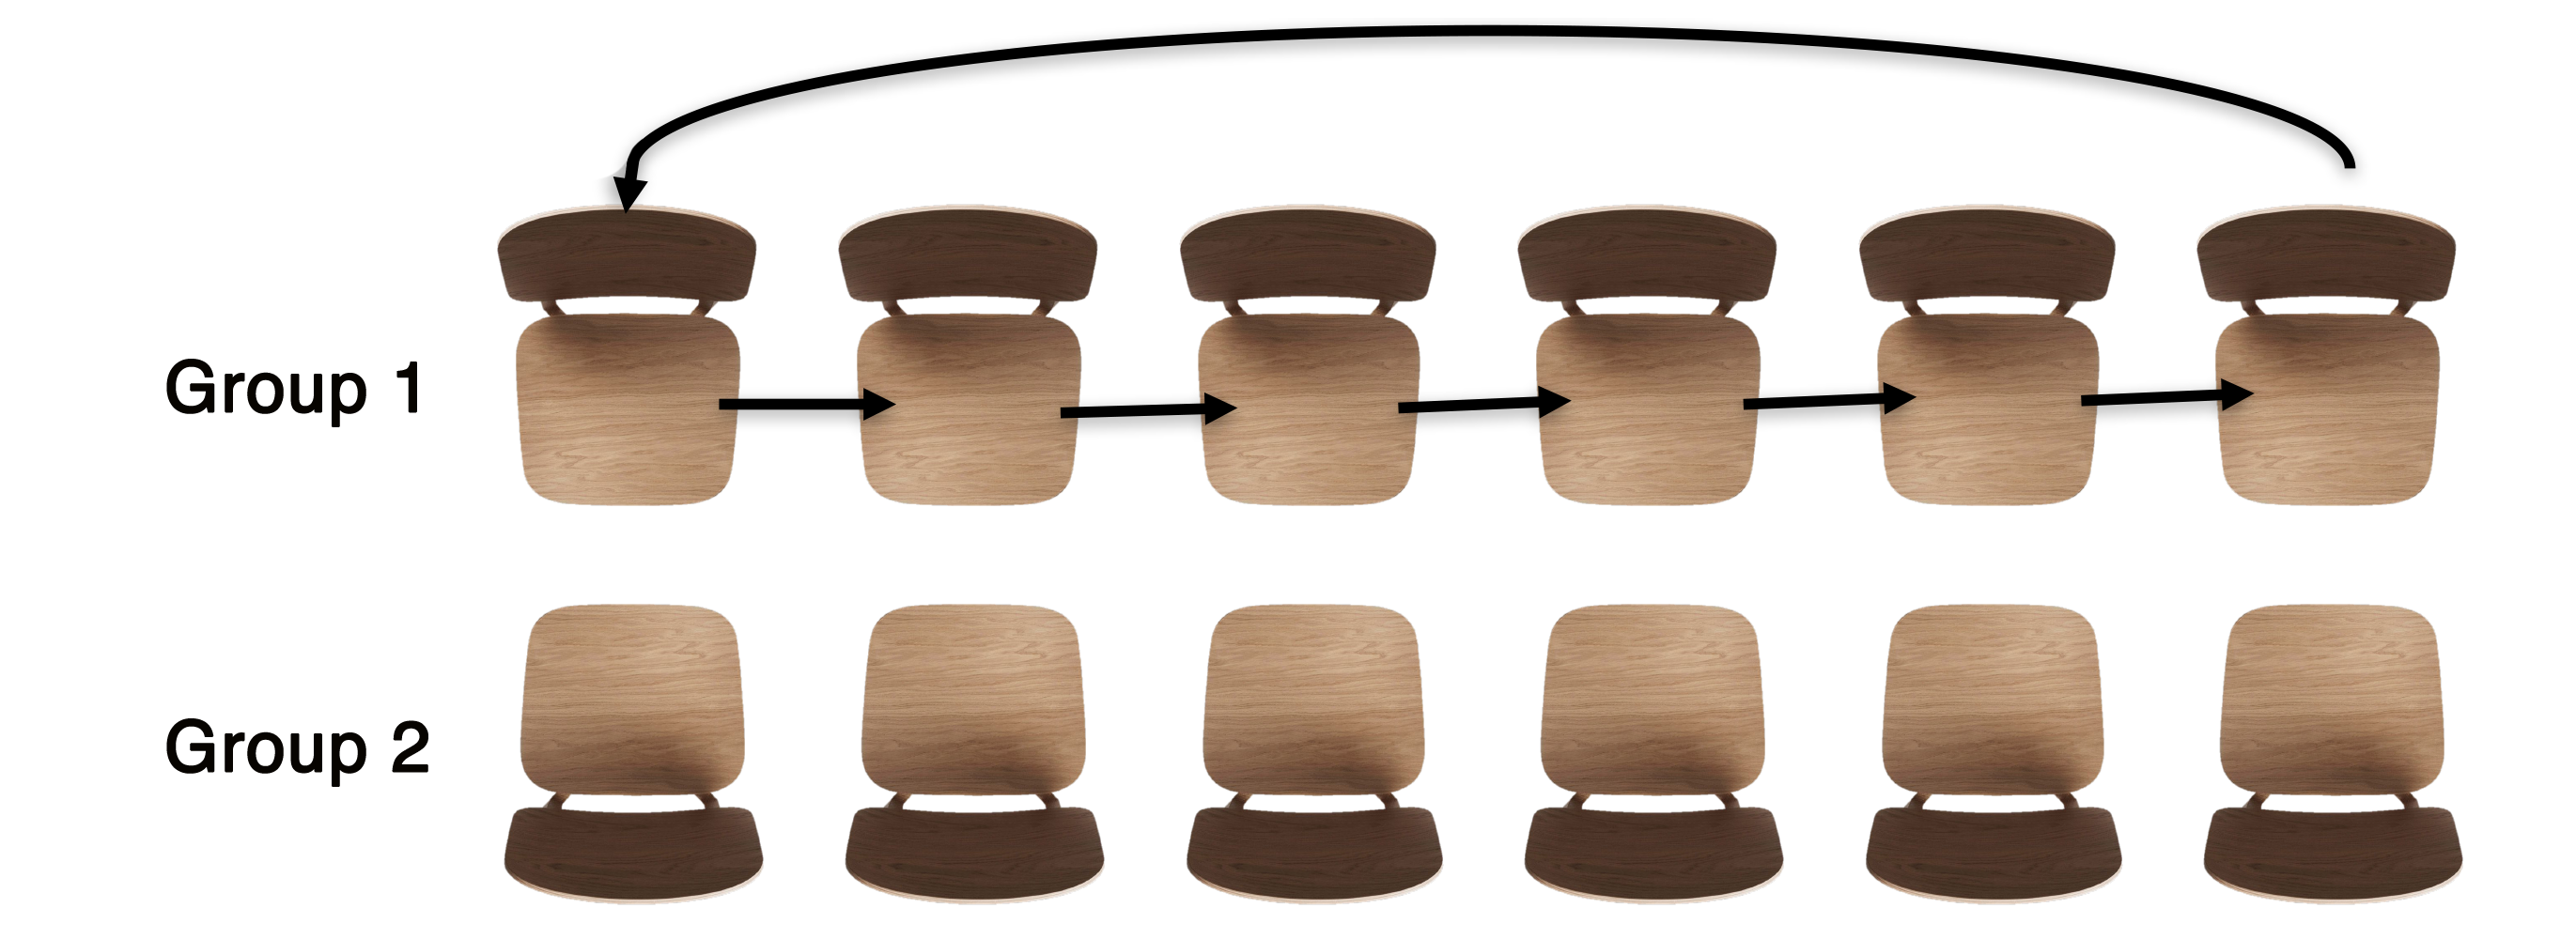
- Divide your class into two groups and set your classroom up to allow pairs of students to face one another and then rotate from classmate to classmate. Establish a clear route for students to move so that they will pair with every classmate.

- You should have 2 sets of the Vitamin and Mineral Fact Cards. Give 1 complete set to the first group of students and the other complete set to the second group. (Do not cut the sheets in half, each card will contain information for 2 different vitamins or minerals)
- Note: It's critical that both groups have a complete set of cards so that students can pair with every card as they rotate through the activity. If your class is smaller than 38, double up on some of the cards. By design, some cards contain less information than others. These are ideal for doubling up or to provide adaptations for ELL students and lower level learners.
- Allow students time to become an expert on the information found on their card.
- Give each student one Vitamins and Minerals, Why are they important? handout. Have students find the section of the handout that their fact card addresses and fill in the blank(s). For example, if they have the “Iron” card, they should fill out the box for the mineral iron. Students are now prepared to start the activity.
- Similar to a “Speed Dating” game, give students 3-4 minutes at each station to share with one another the information from their card and record it on their handout. Use a timer to keep track of time, and indicate when it’s time to switch. The activity will be complete after each student pairs with all of their classmates and their handout is completely filled out.
Activity 3: Preserving Nutrients in Storage and Food Preparation
- Refer back to what students learned about processing fruits and vegetables in Activity 1. Ask, “What value does processing add to fruits and vegetables?” Allow students to brainstorm their ideas. Examples may include:
- Extended shelf life (fruits and vegetables can be eaten out of season)
- Convenience (baby carrots, pre-washed lettuce, or bags of frozen mixed vegetables pre cut and washed)
- Adding variety to how we consume fruits and vegetables (pickles instead of cucumbers, or jam and fruit sauces instead of whole fruits)
- Use the Where Does it Grow? cards on the board from Activity 1. Have students help you identify and circle all of the foods that have been preserved. Define the word preserved as any food that has been canned, frozen, or dried. Explain to students that many of the foods we eat on a daily basis have been preserved in some way.
- Ask students, “Is the nutrient content of a fresh, raw fruit or vegetable equivalent to that of its preserved counterpart?” (no) Explain that as food is preserved (for extended shelf life) or cooked (to be eaten), vitamins and minerals can be destroyed in the process, or ingredients can be added to help preserve the food (salt or sugar are the most common). Some preservation methods and cooking methods preserve nutrient content better than others. First, we will compare food preservation methods.
- Give each student one Preserving Vitamins and Minerals handout. Use the following outline for your discussion and instruct students to take notes on the handout using your discussion and the videos.
- Fresh:
- How: Review the farm-to-fork process.
- Advantages: Fresh fruits typically contain the most nutrients and do not contain added sugar or salt.
- Disadvantages: Fresh fruits and vegetables need to be eaten relatively quickly before they spoil. Fresh fruits and vegetables are not always available depending on season and long distance shipping availability. In some cases the produce is picked before it is fully ripe.
- Frozen:
- How: Watch Frozen Peas: From Farm to Fork (2:23). This video will illustrate the entire farm to fork process for frozen peas.
- Advantages: Increased shelf life, fruit and vegetables can be picked at the peak of ripeness, produce can be enjoyed year-round regardless of being in season.
- Disadvantages: Vitamins B and C can be lost or diminished in the freezing process. There is also potential for freezer burn, change in texture, and flavor loss.
- How: Watch Frozen Peas: From Farm to Fork (2:23). This video will illustrate the entire farm to fork process for frozen peas.
- Canned:
- How: Watch How It's Made: Canned Corn.
- Advantages: Food can be canned very shortly after harvest and canned foods can last 1-2 years or longer.
- Disadvantages: Improper canning methods can be dangerous and lead to food-borne illness. Canned fruit and vegetables have 65% fewer vitamins and minerals than their fresh counterpart, and canning requires an investment of supplies and equipment.
- How: Watch How It's Made: Canned Corn.
- Dried:
- How: Watch How It's Made: Raisins.
- Advantages: Dried foods are lightweight and can be stored indefinitely.
- Disadvantages: Dried foods do not taste the same as fresh foods. They are often exceptionally hard, and do not soften or return to their original state.
- How: Watch How It's Made: Raisins.
- Fresh:
- Discuss cooking methods. Ask students, “When cooking fresh fruits or vegetables, can nutrients be lost in the cooking process?” (yes) Explain that there are many cooking methods for fruits and vegetables and that some preserve or destroy more nutrients than others.
- Have students turn their handout over to the “Cooking Methods” side. Ask students what three things destroy nutrients while cooking. (heat, water, and air) Students will depict these on their handout.
- Ask, “If heat, water, and air destroy nutrients, why do we cook fruits and vegetables?” Give students time to answer this question verbally and on the handout. (Answers may include: increases the flavor, improves texture, tastes better, etc.)
- Place students in groups of 3-4. Explain that they are going to evaluate the elements of different cooking methods to discover the best for preserving nutrient (vitamins and minerals) quality.
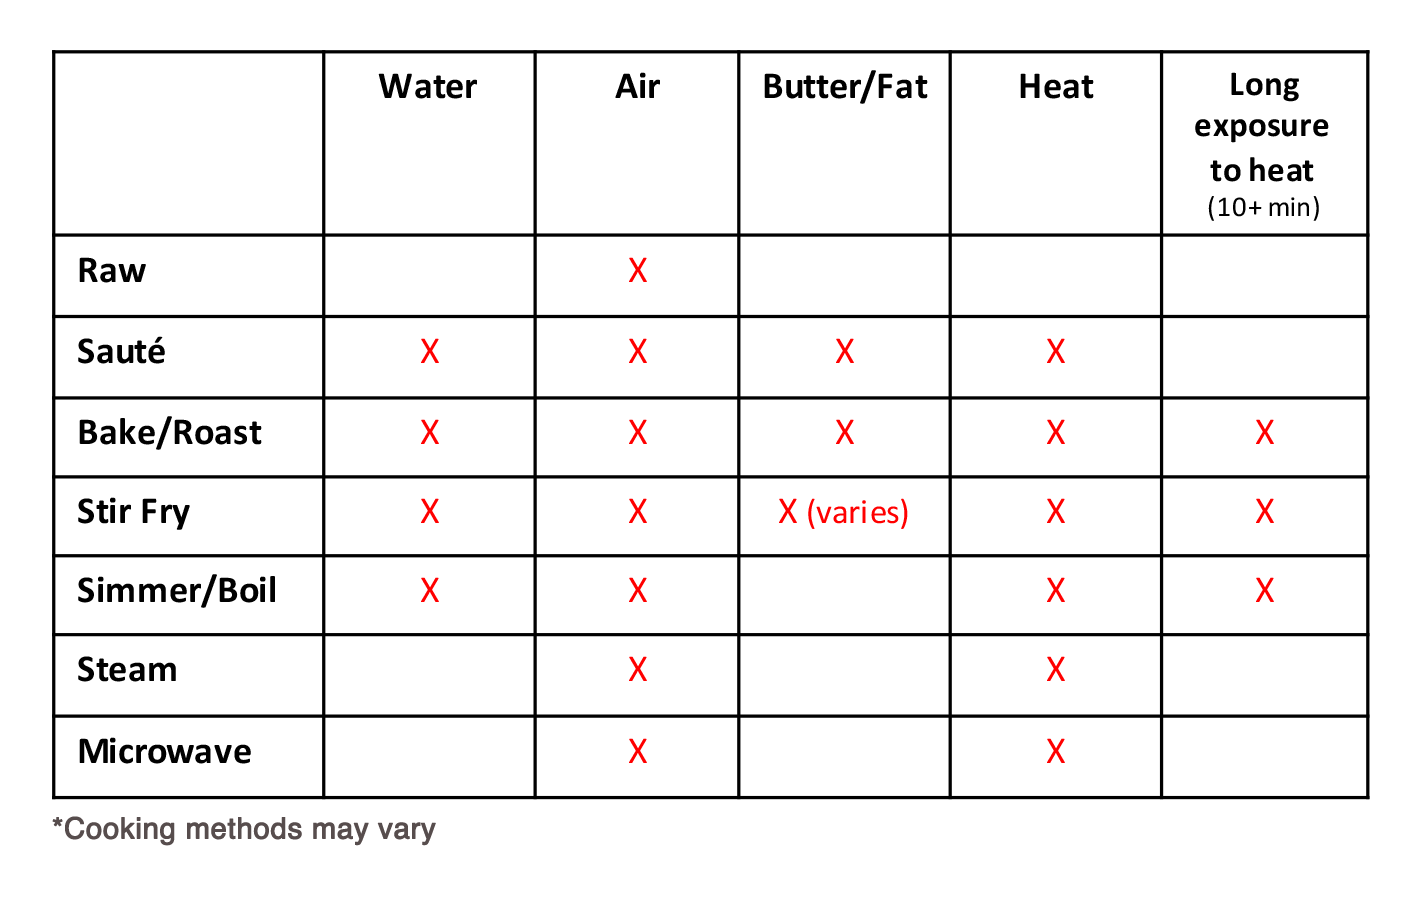
- Instruct students to discuss the cooking methods listed in the table on their handout. Students will work in groups and place an X in the column for each ingredient or element used in the cooking process.

- After finishing the table, have the students make a hypothesis identifying the best three cooking methods for preserving nutrient quality. Give groups 5-10 minutes to finish the chart and make a hypothesis.
- Ask groups to share their hypothesis with the class. Remind the class that everyone cooks food a little different, these cooking methods are general.
- Share the top three cooking methods for nutrient preservation:
- Raw: Raw fruits and vegetables have not been exposed to water, heat, or cooking ingredients. Nutrients are lost as the produce gets older, but the loss is minimal.
- Steaming: Steaming exposes food to heat without contact with water that would wash away nutrients.
- Microwaving: This cooking method uses the least amount of water, usually has the lowest cooking time, and uses least amount of heat compared to an oven or stovetop cooking.
- Share the following tips for preserving nutrients while cooking fruits and vegetables:
- Cook larger rather than smaller pieces.
- Use small amounts of water, and only cook until fork tender.
- Save cooking liquid to use in soups or gravies for added nutrients.
| While helping students understand the concept that nutrients can be lost in the cooking process, confirm that any preparation method that encourages them to eat vegetables is better than eating no vegetables at all. |
Evaluate
After conducting these activities, review and summarize the following key concepts:
- Fruits and vegetables are an important part of a healthy diet.
- Fruits and vegetables provide many essential vitamins and minerals to our diet.
- Cooking and food preservation methods can impact the nutrient content of fruits and vegetables.
- Food processing allows fruits and vegetables to be consumed in many forms and to be preserved for longer periods of time than simply consuming them raw.
Sources
- https://kidsgardening.org/lesson-plans-food-preservation/
- http://mentalfloss.com/article/62014/6-facts-about-preservatives
- https://amazingwellnessmag.com/features/history-of-vitamins
Recommended Companion Resources
Author
Organization
| We welcome your feedback! If you have a question about this lesson or would like to report a broken link, please send us an email. If you have used this lesson and are willing to share your experience, we will provide you with a coupon code for 10% off your next purchase at AgClassroomStore. |